
Make Your Toll-Free Number Work For You
Once you’ve added a toll-free number to your account for making phone calls or for texting it’s important to complete the setup. Your number should work for you by routing your incoming calls and making a good impression on your customers.
There are five things you should do to complete the number setup.
- Choose how calls to the number are handled.
- Add a custom greeting message that represents your company.
- Add a custom voicemail message to introduce yourself.
- Give your number a unique internal name.
- Review the advance settings.
The Importance of Custom Greeting and Voicemail Messages
We strongly recommend you add a custom greeting message and voicemail message to your toll-free numbers, especially text-enabled toll-free numbers. The greeting and voicemail messages are what customers hear when they call your number. If these messages are left as the default setting it makes a bad impression with your customers and make them wonder if your contact is from a trustworthy business.
Text-Enable Toll-Free Numbers Need Custom Messages
When you’re texting, it’s essential your texts include the elements of a trustworthy text. One of those elements is a number greeting that identifies your business.
If customers have doubts about the legitimacy of a business contact via text, they will call the phone number the text was sent from. Having a custom recorded number greeting that identifies your business, assures customers that your business contacts are legitimate.
The same is true for the voicemail message. A voicemail message that includes your name and restates your business name, assures customers your business contacts are legitimate.
Choosing Your Call Handling Option
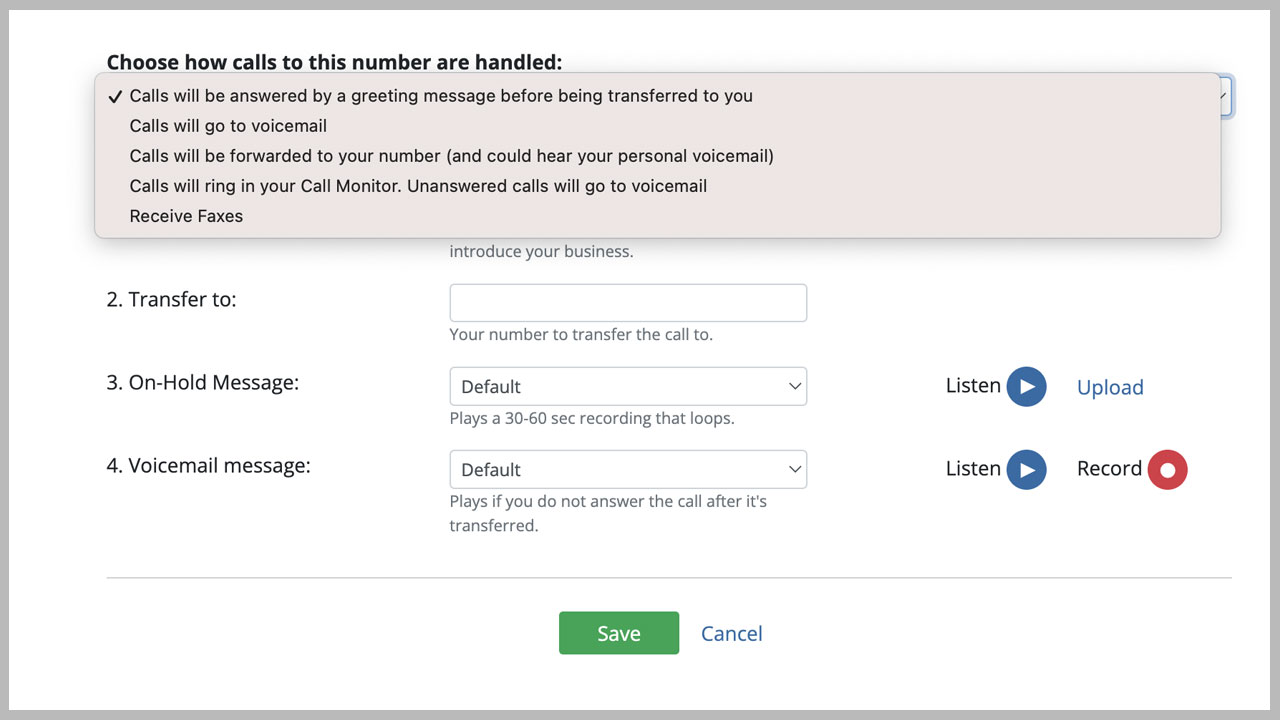
For your toll-free texting number you have four call handling options so you can customize how incoming calls are routed. Your calls and voicemails will be listed in your Call Activity.
Call Handling Options
- Calls will be answered by a greeting before being transferred to you.
- Calls will go to voicemail.
- Calls will be forwarded to your number.
- Calls will ring your Call Monitor. Unanswered calls will go to voicemail.
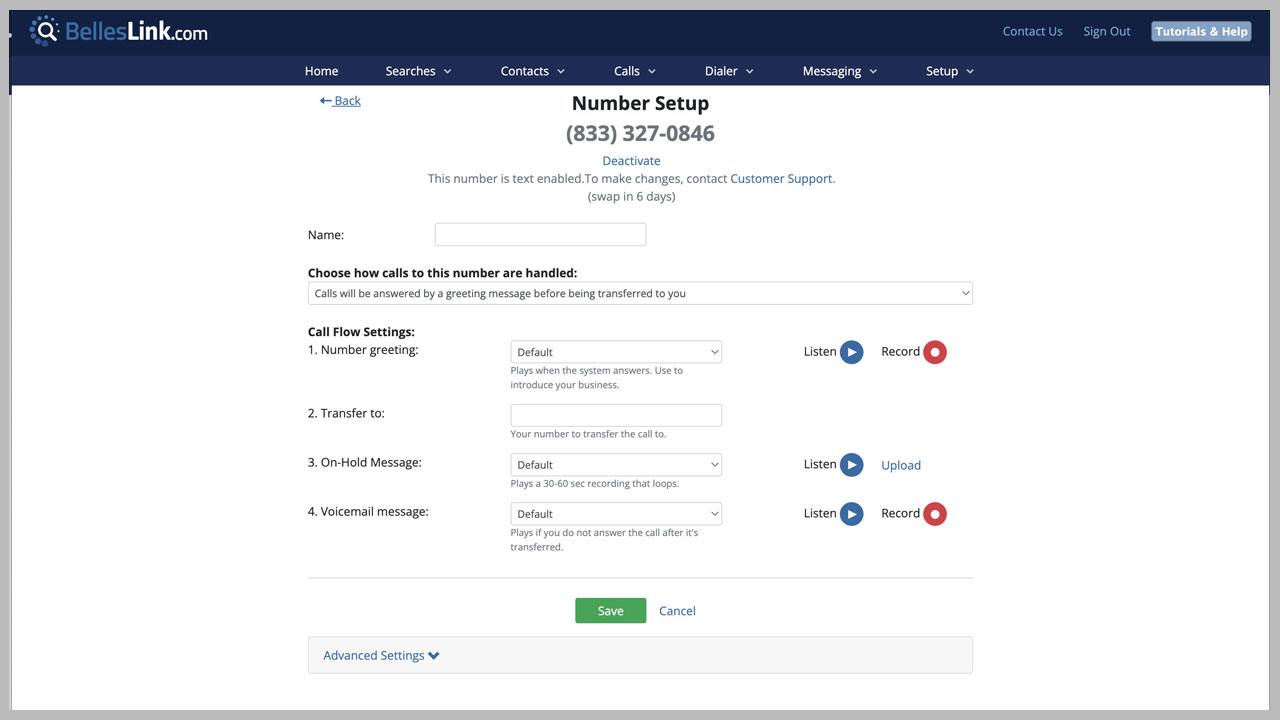
Option 1: Calls will be answered by a greeting before being transferred
This option gives you the flexibility to transfer a call to an outside number before it is sent to voicemail. This is a good choice if you work away from your desk but still want to answer calls when the come in. Every call is answered with a greeting message. Use it to introduce your business. If the call is not answered by the transfer number, it will be sent to your BellesLink voicemail.
Call Flow Settings
- Number greeting: Plays when the system answers. Use to introduce your business.
- Transfer to: Your number to transfer the call to.
- On-hold message: Plays a 30-60 sec recording that loops.
- Voicemail message: Plays if you do not answer the call after it’s transferred.
Option 2: Calls will go to voicemail
This option send every incoming call directly to voicemail. This is good for one-to-one contacts when the caller is returning the call or text from an individual representative.
Call Flow Settings
- Voicemail message: Plays after the call is answered.
Option 3: Calls will be forwarded to your number.
This option transfers incoming calls directly to an outside number, such as your mobile phone. This is good if you always want to receive calls, whether you’re at your desk or not. An on-hold message will play while the system is calling the transfer number. If you don’t answer, the voicemail settings for the transfer number apply.
Call Flow Settings
- Transfer to: Your number to transfer the call to.
- On-hold message: Plays a 30-60 sec recording that loops.
Option 4: Calls will ring your Call Monitor.
This option transfers incoming calls to your Call Monitor so you can answer them in your web browser when your logged into your BellesLink account. This is good if you work at your desk and want to live-answer incoming calls. If you do not answer, the call will be sent your voicemail.
Call Flow Settings
- Transfer to: Your number to transfer the call to.
- Voicemail message: Plays if you do not answer the call.
Custom Greetings and Voicemail Messages
For improved compliance and better contact rates, we recommend that toll-free numbers have custom recorded greeting and voicemail messages. The greeting and voicemail message are what customers hear when they call your number. Use them to introduce your company and yourself to make a good impression with your customers. We created some example of custom messages to help you plan your own.
Selecting Your Custom Messages
Select the custom message to use for the number greeting and voicemail message from the list of available messages in your account. If you don’t have any custom messages, you can create one.
Creating Custom Messages
When you create a custom message you have three options. You can create a voice recording using your computer or mobile device microphone, you can use text to speech, or you can upload a recording to your message library.
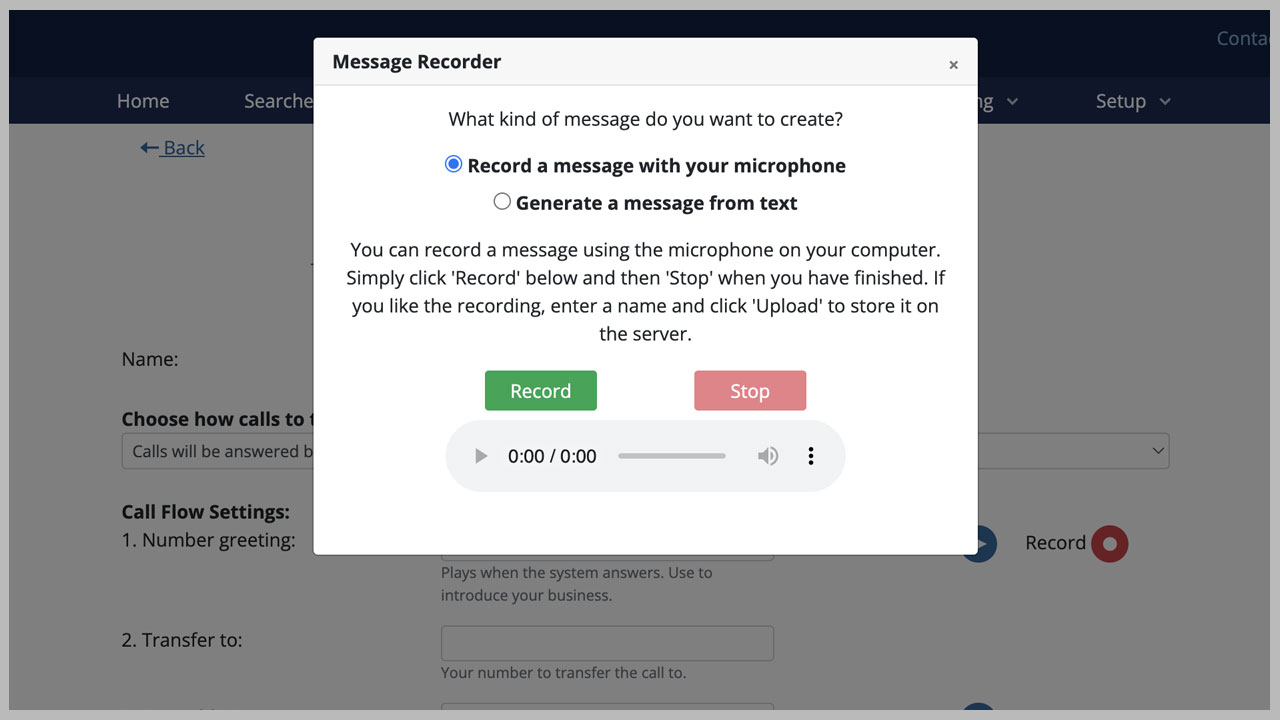
Record a Custom Message
Recording a custom message is easy and works the way you would expect. Use the red Record button, choose “Record a message with your microphone” and follow the prompts. The recording will be saved in your Custom Message Library and will appear in your list of available messages.
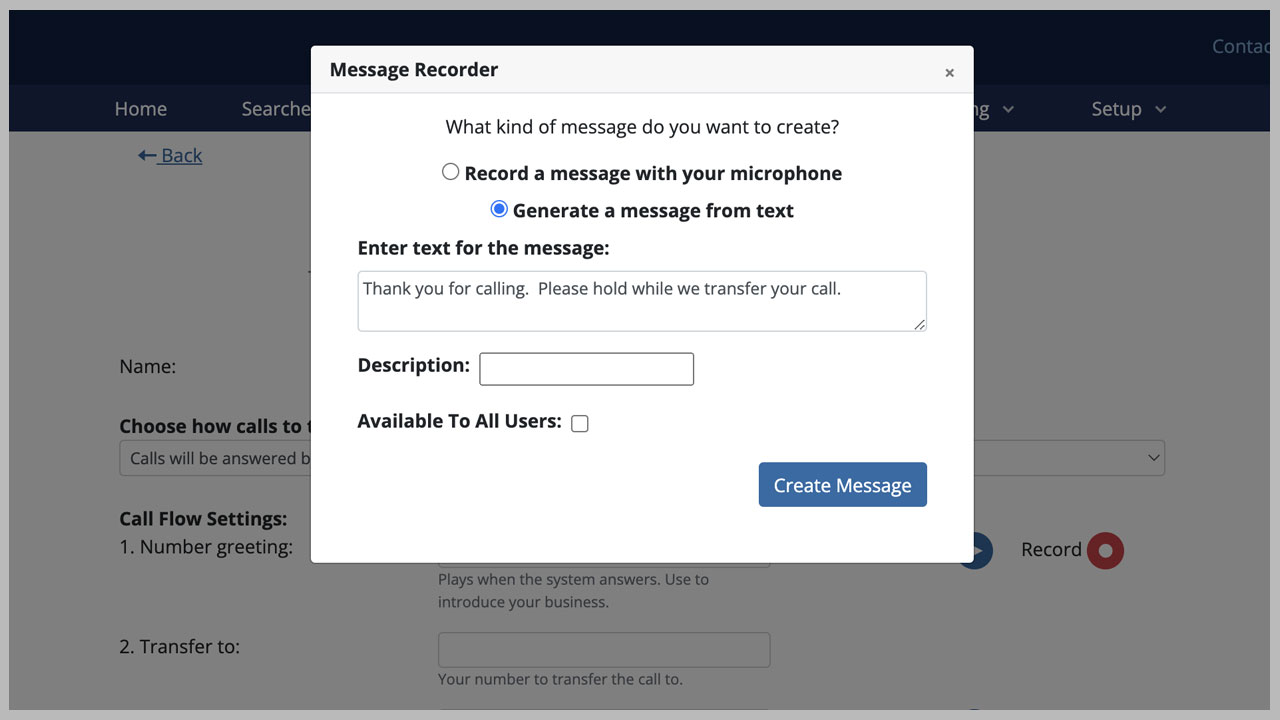
Create a Text to Speech Message
You can also generate an audio recording from text, using our text to speech feature. Use the red Record button, choose “Generate a message from text”. Enter your message text, give your message a name, and the the Create Message button. The voice in the recording won’t sound like you, but it is a fast, accurate way to create a new custom message.
Upload an Audio Recording
You can upload an audio recording as a custom message. It can be any of the following file types: *.wav, *.mp3, *.m4a, or *.aac. On the main menu go to Setup, then Other, then Custom Message Library. Use the Upload Recording button and follow the instructions. You can upload an On-Hold Message the same way.
Once you have your custom message recordings made, assign them to the number greeting and voicemail message.
Finalizing Your Number Setup
With your custom messages assigned, you’re ready to finalize the setup of your new toll-free number for texting.
Name Your Number
Give your number a name. This is an internal name that is only seen within your account.
Review the Advanced Settings
In the advanced number settings you can setup notification and additional call options.
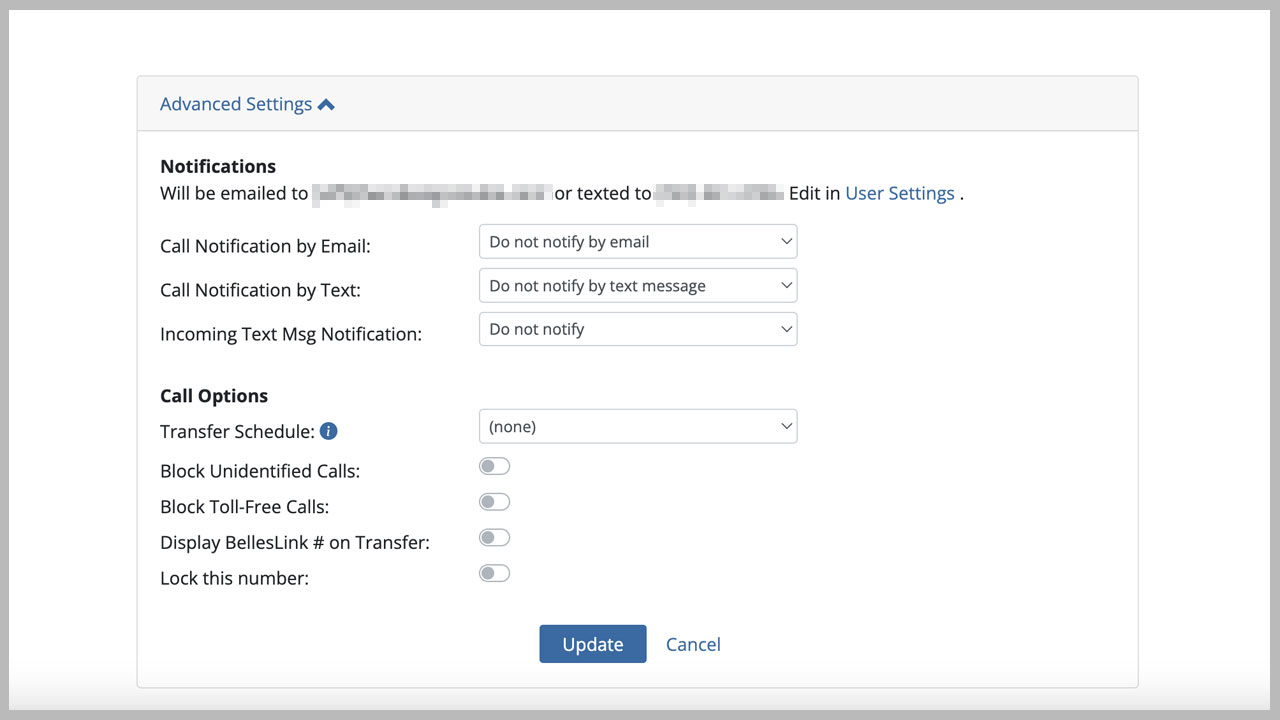
Notifications
You can choose to be notified by email and/or text of any new calls or voicemails on your toll-free number. You can also choose to be notified of incoming texts to the number. The email and mobile number that notifications are sent to are set in your User Settings. On the main menu go to Setup, then User, then Settings to make changes.
Call Options
In call options you can set a transfer schedule to handle calls outside of business hours. Check out our transfer schedule tutorial. You can also block incoming toll-free calls and unidentified numbers, and lock the number so it can’t be accidentally deactivated.
Save Your Number Setup
When your number setup is complete, remember to save it. Use the green save button above the advanced settings.
Setup Complete
That’s it! Your number setup is complete and it’s ready to go to work for you by routing your incoming calls and making a good impression on your customers.
Texting Guides
Checkout our tutorials and guides on business text messaging, registration requirements, and toll-free number verification.
- How to Get Started with Business Texting
- Business Texting Registration Form Guide
- Text Opt-in Methods Guide
- Writing A Text Opt-in Call to Action
- Business Text Message Templates
- Toll-Free Number Setup
- Why Business Text Messaging is Different
- Ineligible Uses for Business Texting
Additional policies, regulations, and laws may exist beyond those listed here. This is not legal advice. It is strongly recommended you consult your own legal advisor for help understanding legal obligations you may have, given the kind of messaging you wish to send.